quarta-feira, 27 de novembro de 2013

Bolsa Bobble-licious... uma delícia!

Este blogue anda uma miséria, há tempos que não escrevo nada...
Hoje escrevo :)

Há uns meses fiz umas malinhas de crianças para duas priminhas. Muito giras e fáceis de fazer, deram-me muita satisfação a confeccionar.
Recentemente encomendaram-me uma delas, igual, mas com fecho, que a primeira não tinha.
Até aqui tudo bem, a não ser o facto de eu nunca ter cosido um fecho na vida....

Lá fui eu em busca de ajuda no todo-poderoso Google. Encontrei este tutorial (de Carrie Wolf), que me pareceu simples e na verdade foi fácil. Até me pareceu demasiado fácil, pensei eu desconfiada. Mas a coisa funcionou e gostei do resultado.
Para coser o forro usei este tutorial (de Alice Merlino) que uso sempre para o efeito, cujos resultados me fazem sempre muito feliz :)

Quanto à mala? É a maravilhosa bolsa Bobble-licious, de Heidi Hengel. Adoro!


A bolsa acabada
The finished bag
O fecho e o forro já cosidos
The zipper and the lining inserted
Detalhe do laço
Bow detail

This blog is dreadfull, it's been a long time since i've posted something...
Today i will :)

Some months ago i made a couple childrens bags for two little cousins of mine. Very cute and easy to make, i was very happy to make them.
Recently i received an order for one of them, just like the other, but with a zipper, which the first one didn't have. So far so goos, except for the fact that i had never sew a zipper in my life...

So there i went searching for help in allmighty Google. I foud this tutorial  (by Carrie Wolf), that seemed simple and was really easy. Almost too easy, i thought suspiciously. But it worked and i liked the results.
To sew the lining i used this tutorial (by Alice Merlino) which i always use, that makes me always very happy :)

And about the bag? It's the wonderfull Bobble-licious bag, by Heidi Hengel. I love it!

sábado, 19 de outubro de 2013

Enviar carinho pelo correio


Este conjunto foi para uma amiga que teve uma bebé.
 
A manta foi inspirada neste pano, de cujo ponto gostei muito. Então resolvi experimentar, seguindo as instruções, mas começando com uma corrente maior. Para fazer o rebordo, fiz uma carreira de ponto baixo a toda a volta. Usei uma agulha de 6,5 mm e linha tamanho 4, em acrílico.
 
Já para o gorrinho (tamanho 3-6 meses, que a bebé nasceu em princípio de Setembro), fiz um beanie simples, usando esta técnica para não se notar a junta quando se fecham as carreiras (obrigada Tamara Kelly, os meus gorros nunca mais foram os mesmos!). Para as orelhas, segui as instruções deste gorro e o laço é uma corrente dobrada e atada, de modo a parecer um lacinho. E pronto! Ficou fofinho, não ficou? E, mais importante, a minha amiga gostou :)


Pormenor do laço
Bowtie detail
 
This set went for a friend who had a baby girl.

The blanket was inspired by this dishcloth, whose stitch i loved. So I decided to try it, following the instructions, but starting with a longer chain. To make the trim, I made a row of simple crochet all around. I used a 6,5 mm hook and worsted weight yarn.

For the hat (size 3-6 months, since the baby was born on ealy September) I made a simple beanie, using this technique to make a seamless job (thank you Tamara Kelly, my hat were never the same!). For the ears, I followed this pattern and the bow is a long chain, folded and straped, in order to look like a bow. And that's it! Turned out cute, didn't it? And, more importante, my friend liked it :)

quinta-feira, 5 de setembro de 2013

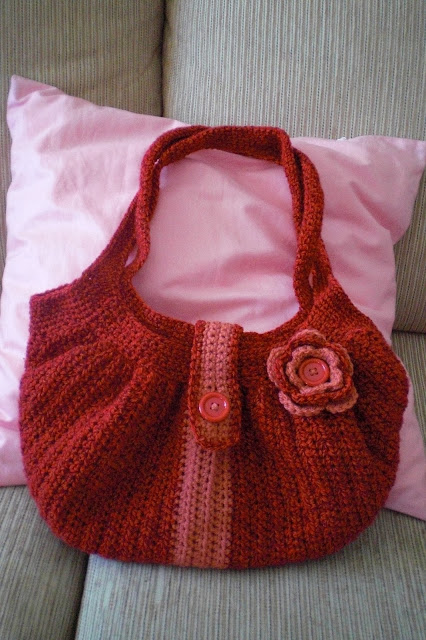
Uma fat bag para a mãe

Quando vi este fio na retrosaria, vi-me logo a fazer uma bolsa para os anos da minha mãe. Encontrei instruções simples na página Bend Beanies.
Usei uma agulha de 4,5mm e o fio é o Bravo, da Coats, que é nº3 (light), pelo que segui a sugestão de acrescentar carreiras de pontos para que a bolsa ficasse maior.
Para coser o forro, segui as instruções da Kel, muito úteis e que uso sempre em todas as bolsas. Neste caso, afinal o tecido era um pouco mais pequeno que o necessário, pelo que tive de o coser mais abaixo do sítio certo, mas serviu ;)
Para a flor, usei a 3 Layer Crochet Flower, da página Swirls and Sprinkles, também uma favorita.
Depois achei que a bolsa ficava muito aberta, pelo que fiz uma pequena aba, com uma casa, para fechar a mala. Dois botões a combinar e pronto!
Adorei fazê-la e a mãe adorou recebê-la :)


Pormenor do fecho e da flor
Closing lid and flower detail

Como podem ver, o forro ficou curto
As you can see, the linning was short

Pormenor na parte detrás
Backside detail
When I saw this yarn at the shop, I immediatly saw myself making a bag for my mom's birthday. So I found some simple instructions on Bend Beanies.
I used a 4,5mm hook and the yarn is Coats' Bravo, whitch is lightweight (#3), so I followed the sugestion of adding rows to make the bag bigger.
To sew the linning I followed Kel's instructions, witch are very usefull, and that I use for every bag I make. In this case, it turns out the fabric I had was a little shorter than needed, so I had to sew it under the place it should be, but it was ok ;)
For the flower, I used the 3 Layer Crochet Flower, from Swirls and Sprinkles, also a favourite.
Then I thoght the bag would be too open, so I made a closing lid. Two matching buttons and done!
I loved to make it and mom loved to get it :)

segunda-feira, 12 de agosto de 2013

O mesmo gorro, flores diferentes

Gorros para as Malhas de Esperança já fiz alguns. Cada vez que faço um, tento fazê-lo com um ponto diferente, uma nova técnica ou um pormenor diferente para assim ir aprendendo coisas novas. Torna-se mais interessante e divertido, e adquiro assim conhecimentos para quando quero fazer coisas novas.
Assim, no caso destes três gorros, fiz um beanie simples, rematei com uma carreira de pontos baixos e acrescentei flores diferentes.
Para a flor lilás e branca segui estas instruções. Este foi um dos primeiros que enviei.
Para a flor amarela, usei a mesma do gorro da minha filhota, com as instruções aqui.
Para a flor lilás e amarela de duas camadas, usei estas instruções.

Nada mau, hã? ;)


I've already made some hats for Malhas de Esperança. Everytime I make one, I try to do a different stitch, a new technique or a different detail in order to learn new things. It gets more interesting and fun, and I get knowledge for when I want to make new things.
So, for these three hats, I started by doing a simple beanie, ending with a row of simple crochet, and added different flowers.
 
For the white and lilac flower, I followed this pattern. This was one of the first I sent.
For the yellow flower, I used the same as my girl's hat, with this pattern.
For the two layer yellow and lilac flower, I used this pattern. This is one of my favourites.
 
Not bad, ha?
 

domingo, 28 de julho de 2013

Mochos!

Nas minhas pesquisas em busca de ideias para fazer gorros giros encontrei muitas referências a motivos de animais. Mostrei ao meu filho uma página do Pinterest onde havia várias opções e perguntei-lhe se queria algum daqueles gorros. Pediu-me um mocho ("amaielo!") e fui em busca de uma página com instruções. Encontrei esta, de Crochet in Color, que tem instruções para bebé e também como aumentar o tamanho para os 4/5 anos.
Basicamente é um gorro beanie, ao qual se acrescentam as protecções para as orelhas e as aplicações dos olhos, bico, sobrancelhas e penachos.
Bem, o puto adorou! Passou o resto do Inverno e também a Primavera (que foi fria) a levá-lo para o infantário. A irmã de vez em quando também o ia buscar para o pôr na cabeça, quando andava na brincadeira cá em casa :)

Entretanto, fiz outro, desta vez roxo, para o filho de uma amiga que já não via há algum (muito) tempo, quando os fui visitar. Para este, fiz algumas alterações: para o gorro usei o ponto alto, em vez de meio ponto alto; em vez de botões para as pupilas fiz aplicações em crochet, cosendo-as descentradas, e não fiz as íris dos olhos; quanto às sobrancelhas, fiz duas correntes e cosi-as, em vez de as fazer directamente no gorro. Depois de acabado, achei que tinha ficado curto, e acabei por aumentar o número de carreiras no acabamento branco.

Estes gorros deram-me muita satisfação a fazer, e revelaram-se surpreendentemente fáceis. A repetir, mais cedo ou mais tarde ;)


Researching for ideas for cute hats I found a lot of references to animal motifs. I showed  my son a page on Pinterest with many options and asked him if he wanted any of those hats. He asked for an owl ("yellow!"), so I went looking for a pattern. I fund this one, from Crochet in Color, which has instructions for a baby hat, and also how to increase to a 4/5 year old.
It's basically a beanie, to which you add earflaps and the eyes, beak, eyebrows and tassels.
Well, the kid loved it! During the rest of the winter and this cold spring he took it almost everyday to kindergarten. And his sister, while playing, would pick it up to wear it at home.

Meanwhile, I made another, this time a purple one, for a friend's kid, when I went to visit after a long time without seeing them. I made some changes for this one: for the beanie I used double crochet instead of half-double crochet; instead of buttons for the pupils I made apliques and sewed them off-centred; and for the eyebrows, I made two chains and sewed them to the hat, instead of stitching them directly. After finishing it, I foud it short, so I added some more rows to the white border.

This hats were very pleasing to make and turned out surprisingly easy. I'll soon be repeating it ;)

domingo, 21 de julho de 2013

Um gorro de coelhinho

Ora, este Carnaval o meu filho mais velho ia no desfile do infantário com os colegas, com o disfarce que lá lhes tinham feito. Mas eu queria que também a irmã, mesmo que fosse no carrinho, se mascarasse de qualquer coisa. Então encontrei este gorro, no site Tampa Bay crochet. E pronto! Assunto resolvido! Para fazer o gorro, tive de fazer algumas alterações, já que não tinha uma agulha do tamanho certo, pelo que fui acrescentando carreiras e experimentando na cabeça da garota :) No fim, em vez de fazer uma carreira de pontos baixos cor-de-rosa, mantive a cor e fiz ponto de caranguejo.
Para as orelhas, segui as instruções, mas como não tinha fio rosa, improvisei com o fio mesclado que cá tinha (não é de grande qualidade, mas como não ficava em contacto com a pele dela, não fez mal).
 
O resultado foi este. Não ficou uma coelhinha tão fofa?


This Carnival my eldest son was going on his kindergarten parade with his classmates wearing the disguise they had made for them. But i wanted his sister to go in disguise too, even in her stroller. So i found this hat, on the site Tampa Bay crochet. So that was it! Problem solved! To make the hat i had to make some changes, since i didn't have the right hook, so i went adding some rows and trying it on the kid's head :) In the end, instead of making a final row of single crochet in pink, i kept the white and made a row in crab stitch.
For the ears i followed the instructions, but since i didn't have pink yarn, i used some mixed colours one (not the best quality, but since it wouldn't touch her skin, it was allright).

So this was the result. Wasn't she a cute bunny?

sábado, 20 de julho de 2013

Começando

Em Novembro do ano passado tomei conhecimento de uma página no Facebook, Malhas de Esperança, que pretendia recolher gorros para entregar nos hospitais onde havia crianças a fazer tratamentos oncológicos. Achei a ideia óptima, mas não sei tricotar e há muito tempo que não fazia croché. No entanto, tinha mesmo muita vontade de ajudar, e fui investigar.
Encontrei na internet um mundo de instruções, tutoriais, padrões.... O difícil era escolher o que queria fazer :)
Então comecei por fazer um gorro para a minha miúda, na altura quase com 1 ano, para experimentar. O resultado encorajou-me, e desde aí tenho adorado fazer gorros, chapéus e outros mimos, não só para as Malhas de Esperança, como para oferecer a amigos e familiares.

Entretanto criei um álbum no meu perfil do Facebook com as coisas que tenho feito, não só em croché mas também em ponto cruz, e a ideia de fazer um blogue para a divulgação destes trabalhos começou a surgir.

Por isso cá estou. O nome do blogue evoca a finalidade do meu trabalho. O carinho que ponho em cada pontinho, um pequeno cuidado que quero prestar, na língua inglesa é mais fácil exprimir a minha intenção. To care, cuidar.

Tendo em conta que, na maior parte das vezes, as peças não são ideia minha, sigo apenas as instruções que alguém teve o trabalho de criar, vou colocar o link para a ideia original, de modo que quem quiser também possa fazer a peça. Atenção, que estarão em inglês.
No entanto, se não tiverem disponibilidade, ou não o souberem fazer, e se quiserem mesmo muito, podem enviar-me um e-mail. Se me for possível, poderei fazê-la :)

Entretanto o projecto Malhas de Esperança continua. Se quiserem participar, seja com gorros, ou enviando fios, visitem a página. Todos são bem-vindos!

Em seguida mostro aquele primeiro gorro que fiz para a minha filhota, seguindo as instruções do Girly Beanie aqui.


In November last year I came upon a page on Facebook, Malhas de Esperança, which intended to gather hats to deliver to hospitals where there are children undergoing cancer treatments. I thought it was a great idea, but I can't knit and I hadn't crochet in ages. However, I really wanted to help, so I went looking.
On the internet, I found a world of instructions, tutorials, patterns... Hard was chosing what I wanted to do :)
So I started by making a hat for my girl, who was about to turn 1 year old, to try it. The results where encouraging, and since then I've been loving to make hats and other little things, not only for Malhas de Esperança (stitches of hope, in portuguese), but for family and frends also.

Meanwhile, I created an album on my Facebook profile, with the things i've been making, crochet and cross stitch too, and the idea of making a blog to show it started to grow.

So, here i am. The name of the blog reminds the intention of my work: to care, with care.

Now, most of the time, the things I make are not my ideas, but someone else's, someone who took the time to create them and write them, so I will link to them, so that you too can make these items if you want.

Up here I posted the pictures of that first hat I made for my daughter, following the instruction for the Girly Beanie here.